These days it’s easy to forget that Flash is an amazing classic animation tool. Ever since the arrival of the fine Macromedia Tween Class and the amazing Fuse Kit (a new version was just released) and great books like Foundation Actionscript Animation, by: keith peters, new version for Actionscript 3.0 is on the way(not affiliat), it seems that we want to script our animation no matter what! Now, don’t get me wrong, I also think that scripted animation is very powerful and I use it all the time. But, I sometimes find myself over using it in places where I should have used a simple tweening instead.With the 8th version of Flash we received a nice improvement to the tweening capabilities, it is now possible to achieve a relatively complex tweening animation with only two key frames. Check out this tutorial: Achieving Amazing Easing Effects in Flash, by: Rafiq R. Elmansy.
And what about the new kid animation abilities?! With what I’ve seen so far in the main WPF interactive editor CTP (beta) vesions, it fall short of Flash, it has an interesting concept of having the animation of an object as just another property of that object. But, it lake of satisfactorily key-frames controll and things like shape tween are not existent. These things might be improved in the final version, but it seems to me that Microsoft is still donesn’t pay atantion to creativity as it should have, and is mainly thinking about GUI creation.
I just hope that Adobe wont forget the origins of Flash and one of the main reasons it is such a terrific tool, and is planing a tons more of animation and creativity features in the next Flash IDE release.
Note: I’ve written this post some time back, before the announcement of the new Flash CS 3 (Flash 9) feature list. It seems that we’ll get some animation improvements, the two most interesting improvements looks like, Custom easing control and Copy and paste animations. The first will “provides independent control of position, rotation, scale, color, and filters”, it will give us much finer control over every keyframe in our animation similar to high-end animation software. The second will let us copy timeline animations as fully editable Actionscript 3.0 XML objects for easy duplication and modification. It looks like even complex tweening that uses a motion guide can be copied and edited, no clarity about the coping of a shape tweens though. I guess no one at adobe have the nerve to dive into the Flash core and update something as the Shape Hints or even the Timeline itself, but overall, it seems like a nice update in terms of the animation abilities of Flash.
Flash CS3 will be released in April 20th.
Behind The Curtains – Shape Hints Animation Tutorial
Hover above this box:
[kml_flashembed movie=”/content/images/2007/04/curtain.swf” width=”320″ height=”240″ /]
I was amazed when I first saw shape animation in flash, create two different shapes on two different frames and easily get a morphing animation between them…
Few years back I was asked to make a flash banner for Habima Theater. I came with the, somewhat cheesy, idea of a animating a red curtain, and inside it, to fade images from few of the theater best shows.
Creating a curtain animation in Flash shouldn’t be a problem, I thought, I’ll create the start and finish frames and my beloved Flash will do the rest. The start frame of a simple curtain animation is simply a box and the end frame is an open curtain…
1. Create a new Flash Document, resize it to 320 x 240 and set the Frame rate to 30.

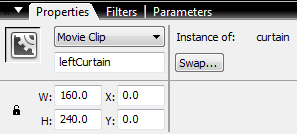
2. Create a red rectangle (R) anywhere on the stage no matter what size, select the rectangle and set it’s properties (Show/Hide Properties Ctrl+F3): width and height to 160 and 240 respectively, x and y both to 0.
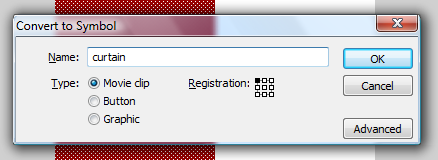
3. With the rectangle still selected press F8 to turn it into a Movie clip, and name it curtain.
4. Inside the properties panel name the instance of the curtain on stage to leftCurtain.
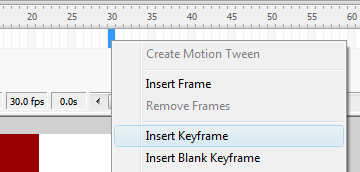
5. Double click on leftCurtain to step inside it. On the Timeline (Show/Hide the Timeline Ctrl+Alt+T) name Layer 1 to curtain. Right click on the 30th frame and select Insert Keyframe (F6).
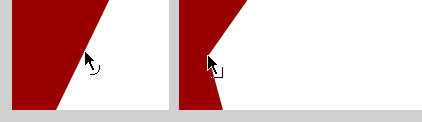
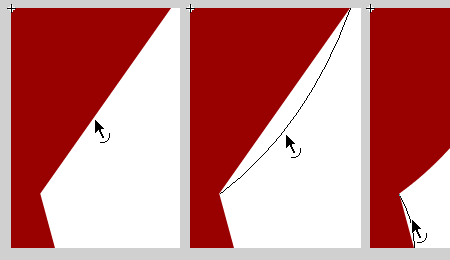
6. The first frame of our animation, the closed state of our curtain is already done on frame 1, we’ll now create the opened frame on frame 30. Deselect the red rectangle by clicking anywhere outside it on the stage. Point your mouse to the bottom right corner of the rectangle until the mouse cursor turns into a right angle shape, this indicates that you can grab the corner. With the Shift Key pressed click and drag the rect corner to the left and to about 45px from the left edge.

7. In order to achieve an open curtain look we’ll split it near the bottom. Point the cursor near the edge of the now diagonal line to about 50px from the bottom. When the cursor changes its shape to a small round line, press Ctrl and click to drag the new point to left to about 30px from the edge. Pressing on the Ctrl key while dragging a line breaks it and creates a new point where the break is.
8. Similar to the previous step, hover with the mouse near the right edge of the rectangle, when the cursor change it’s shape click and drag (without pressing Ctrl) the edge until it gets a nice belly, do the same for the small right edge.
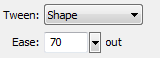
9. We done the entire 2 frames of our animation, now it’s time to animate it. In the Timeline Select frame 1 and in the properties panel set Tween to Shape, also set Ease to 70, it will make the animation nicer by easing it near the end.
10. It looks like we got ourselves an opening curtain animation, but testing the movie (Ctrl+Enter) reveals that though we got an animation it’s nothing like a believable curtain. This is because Flash can’t know what exactly we’re animating and how we like the morphing to be done. Flash simply guess, and this time its guess is very wrong. This is where Shape Hints come to our aid.
11. Select frame 1 and click on Modify -> Shape -> Add Shape Hint (Ctrl+Shift+H) 5 times. This will create 5 Shape Hints identified by characters from a to e. Arrange the Hints in the 4 corners and 1 where the break is, look at the image. Go to frame 30 and arrange the Hints respectively to the 1th frame. Every Hint character in frame 1 must correspond to the Hint character in frame 30.
Tip: you can lock the layer and still be able to edit the Shape Hints.
Tip: Show/Hide all the Shape Hints Ctrl+Alt+H
12. Now lets test our movie (Ctrl+Enter) to see our curtain animate to its open state as it should.
13. To create the closing animation the simplest way is to duplicate the frames and then reverse it. Select all the frames in the curtain layer by clicking on its name and Right click -> Copy frame then Right click on frame 31 and select Paste frames. This will copy the opening animation, Shape Hints included. Click on frame 31 and while the Shift key is pressed click on frame 60 to select all of this frames range. Right click on the selected frames and click Reverse frames, it’ll reverse the animation but sadly it’ll also break the Shape Hints of this section, you’ll have to create it again for frame 31 and 60, similar to the previous step.
14. Select frame 31 and in the properties panel set the Ease to -50, this will create an ease-in effect so the closing animation will start a bit slower and then accelerate as it goes.
15. Test the movie to see the (half) curtain open and close. Thats it, we’re done our curtain animation it’s time to duplicate the half into a full curtain and put some interactivity into it.
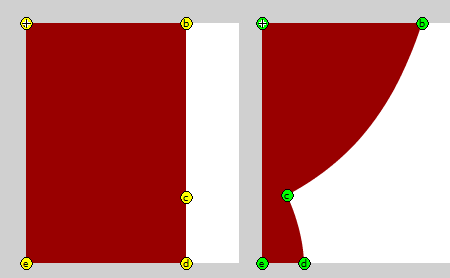
16. Before you go back to the main stage add another Layer inside the curtain Movie clip and name it actions. Click on Window -> Actions (F9), while the first frame selected enter the code stop(); inside the Action panel. Create a new key frame on frame 30 of the actions layer and put a stop(); in there as well. This will prevent the curtain from animating on its own and we’ll control it with Actionscript.
17. Go back up to Scene 1 by double clicking on an empty area of the stage. Copy the leftCurtain Movie clip, paste it any where, set its x to 160, its y to 0 and its name to rightCurtain.
18. With the rightCurtain selected click on Modify -> Transform -> Flip Horizontal.
19. On the main Timeline in Scene 1 create another layer and name it actions open the actions panel (F9) and enter the following script:
function openCurtain():Void{
leftCurtain.gotoAndPlay(1);
rightCurtain.gotoAndPlay(1);
}
function closeCurtain():Void{
leftCurtain.gotoAndPlay(31);
rightCurtain.gotoAndPlay(31);
}
20. We can call these functions to open and close the curtain as we like, in this example we’ll open the curtain when the mouse roll over it and close it when it roll out.
21. Create another layer beneath the actions layer but above the curtain layer and name it hitArea. Draw a green rectangle and set it’s alpha to 0%, the color doesn’t really matter since this rect will be invisible, also set it’s width to 320, height to 240 and x, y to 0. Click F8 to turn this rectangle to a Movie clip and name it hitArea. in the properties panel name the hitArea instance on the stage to hit.
22. Add this code to the actions layer:
hit.onRollOver = openCurtain;
hit.onRollOut = closeCurtain;
Now every time we roll over the invisible hit Movie clip that is above the curtain the function openCurtain will be called and when we’ll roll out from it the closeCurtain will be called.
23. Test the movie to see that we now got our interactive animated curtain, roll over it and it opens, roll out and it closes. But, if you’ll play with it a little you’ll see that it’s not always act as it should. For example, when you roll out while the curtain is opening it jumps to beginning of the closing sequence instead of closing from the current position. To fix that we’ll add a simple calculation to find the right frame we need to jump to in order for the animation to look seamless.
24. Replace the code in the action frame with this:
hit.onRollOver = openCurtain;
hit.onRollOut = closeCurtain;
var nTotalFrames:Number = leftCurtain._totalframes;
function openCurtain():Void{
var nFrame:Number;
if(leftCurtain.currentframe > nTotalFrames / 2){
nFrame = leftCurtain.totalframes – leftCurtain.currentframe + 2;
}else{
nFrame = leftCurtain.currentframe;
}
leftCurtain.gotoAndPlay(nFrame);
rightCurtain.gotoAndPlay(nFrame);
}
function closeCurtain():Void{
var nFrame:Number = leftCurtain.totalframes – leftCurtain.currentframe;
leftCurtain.gotoAndPlay(nFrame);
rightCurtain.gotoAndPlay(nFrame);
}
We just changed the open and close functions to be a bit more smart ones, function that knows to which frame to gotoAndPlay, it does it according to the current frame and not just jump blindly to the beginning of each sequence.
Test the movie and behold, our interactive curtain is ready.
Tip: you can add this code, hit.useHandCursor = false; so the cusror won’t change into a hand when you hover the curtain.